Tuesday, June 1, 2010

A Renewed Daily Art Practice, at Last

Hard to believe it has been over two weeks since the Art & Garden Party! The weather was perfect that day, the flowers were gorgeous, and a couple of close friends tried the morning drawing lessons. They both claimed they haven't done any drawing since childhood, but they took to it quickly and made a couple of lovely watercolor sketches each - beautiful! Many thanks to the many friends who came and enjoyed the day together. I am grateful to each of you. Perhaps it will be an annual event.

Now I am in Fernville, our Adirondack property, and enjoying all this place has to offer, even though Spring is late to unfold here, and in mid-May the Beech leaves are still softly opening, downy and rosy. In addition to the things I love so much here - the rivers and lakes, wonderful birds (Mourning Warblers, among others, the other day), a lively arts community, and fascinating people  - I have found a life coach who is helping me enormously by getting me on track with my art making and art business. With her encouragement, I am again making time for a daily art practice. For now I am working with a book about fabric embellishments that I received as a gift several months ago. Below is the piece I made with "Tucks" - inserting various bits and pieces in each tuck. I included fabric scraps, photos cut from old natural history encyclopedias, and embroideries cut from sheer fabric. It makes me think of a beach scene.

The next day, my project was "Deconstructed Quilts." Taking small scraps of fabric, the pieces are assembled on a square of fusible web and then ironed to bond them together. For this one, I used some of the off-white embroidered fabric I used for the beachy piece, as well as an old fabric piece made by printing a photo of one of our cabins onto muslin. It has faded somewhat, and I cut it apart to reassemble the pieces with other fabric scraps. Here you see the piece before I did any of the machine embroidery. Four pieces are in progress now, and I am so glad to be learning some new things! Thank you, Jane!!!

Friday, May 14, 2010

Art & Garden Party Preview

I've been busy preparing for the Party here at our Frogmoor home to be held on Sunday, May 16th. My sweet husband Ron has been helping me in enormous ways in the garden and in the house, and this is good way to get set up for the summer. The porch is clean, the patio table painted, and some gardens mulched. Never really done, of course, but on its way to easier.

Here are a few of the art pieces I'll be showing and selling at the party.


Some of these are originals; some are available as prints. I also have a nice selection of my Reminder Pins, made from mostly recycled materials.


Lots of great cards too, made from my paintings and collages.


Some other fun things to look at - visual journals, little books, and dolls. 

Here is the schedule for Sunday:


10 AM - Noon
Drawing Workshop in the Gardens
Bring your own art supplies and a folding stool or chair. I will help you get going and supply loads of encouragement! The workshop will be limited to 10 people, so be sure to let me know as soon as you can to reserve your place.
Noon - 1 PM
Potluck Brunch


 Just bring along some small yummy dish to share and we'll enjoy some food and conversation.
No need to reserve for this.


Noon - 3 PM
Art Show & Sale  
My original art work, along with prints, cards, and canvas bags will be on display in the Foyer Gallery. Some of the work will be displayed for fun and your enjoyment - visual journals, handmade books, collage, and more. The other art will be for sale, so think weddings, birthdays, Father's Day, etc. No reservation required to view the gallery.
The Party will be held at my home at:


112 Crestview Drive
Valatie NY 12184 

To get here from Valatie:

Drive north about 3 miles on Rt. 203. Turn right on Crestview Drive, go up the hill about .5 mile until you see the red mailbox with the number 112 on it. Park along the left side of the driveway. (Try not to block or park in the turn-around spot - Thanks)


To get here from North Chatham:
Drive south about 1.5 miles and look for the first left turn past the Chathams Animal Hospital. 
Turn left on Crestview Drive, go up the hill about .5 mile until you see the red mailbox with the number 112 on it. Park along the left side of the driveway. (Try not to block or park in the turn-around spot - Thanks)

Please bring a friend and come over to say Hello!

To Contact Me:
518.524.0533

Monday, May 10, 2010

Gardens in Bloom

The gardens are gorgeous right now, and I am hoping the weather will stay cool this week so the flowers will not go by too quickly. Above is a view down the wildflower garden I planed along the steps leading into our woods. Those of you who come to the Art and Garden Party on Sunday (May 16th) will enjoy translating some of the beauty into a small work of your own. Here are some photos of the wildflower Bloodroot (Sanguinaria canadensis) that blooms in April in my gardens.


And here is a little watercolor sketch I did while sitting in the woods watching them.


What you will see next weekend includes Dwarf Crested Iris, Foamflower, Solomon's Seal, Creeping Phlox, Jacob's Ladder, and the mostly-unfurled ferns - Maidenhair, Broad Beech, Lady, Christmas, Ostrich, and Interrupted, among others. Lots more - come and see!

Wednesday, April 21, 2010

A Little Wild Green Thing Every Day

In early Spring, I like to find some wild green thing each day to provide nourishment and extra flavor to our meals. I brought Wild Leeks (or Ramps) back down with me from a gorgeous stand in the Adirondacks on Sunday and made a big pot of Wild Leek and Potato Soup. Then I found some Wild Leeks here along our favorite walking route and threw the chopped lilies (did you know leeks and all onion-related plants are in the Lily Family?) into an Indian lamb dish with peas. Yesterday I picked some fiddleheads from the abundant  Ostrich Ferns in my wild flower garden and braised them in olive oil for lunch, served with a squeeze of lemon juice and a shaving of Parmesan cheese. Today, it was stray garlic plants and sorrel from the vegetable garden (not exactly wild, but weeds, more or less) with garlic mustard and dandelion leaves in the quiche.

There is something about  going out and picking something usually neglected (and even sometimes despised) as culinary subject-matter that makes me feel connected to all the abundance at my careless feet. 
The asparagus just made its way through the mulch yesterday and the salad greens are starting to make something of themselves (sown by some goddess from seed pods I allowed to mature late last summer). Soon, the garden will generously provide more than we can possibly keep up with (and we are REALLY lazy), but even then the wild berries will drip from the brambles at the edge of the field. We strain to plant and weed and mulch and fertilize, and sometime I wonder what for. In this very green part of the planet, we literally trip over and chop down the bounty provided by Nature. Did I mention that someone told me fiddleheads go for over $6 per pound at the fancy produce stores? Please pardon my amusement....

Thursday, April 15, 2010

Spring Wonders on a Small Scale


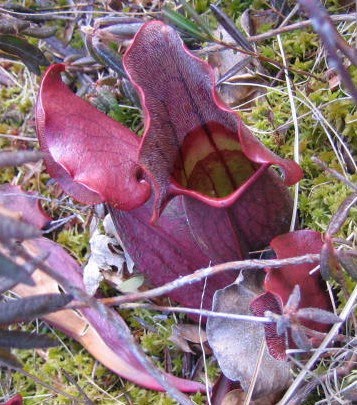
Spring is arriving in the Adirondacks too. It is slower, colder, perhaps more reserved for now. This morning I heard a poem on the radio about a sweep of  hundreds, maybe thousands, of daffodils by water. What a gorgeous spectacle that must be! But here, I’ll take my spring wonders in smaller scales. The beautiful reds of over-wintered pitcher plants and sphagnum moss. The surprising purple on the scales of a balsam fir cone, recently disassembled by a red squirrel for the rich seeds hidden there. And (above) the unfolding leaves of Hobblebush, a wild and native viburnum that has surely one of the most wonderful flowers to be seen in the May woods up here.


Saturday, April 10, 2010

Yoka Wallets

Yoka Wallet Assortment

So, what in the world is a "Yoka Wallet"? First I'll introduce you to Yoka Hart. I met this sunny, friendly, lovely woman at the internet shop in El Valle, Panama as we both struggled with the technology of getting our photos onto our travel blogs. (Click here for Yoka's blog.) A few days later, I stopped on my bicycle at the sweet little apartment she and her equally-lovely husband Matthew were renting for the month on the outskirts of El Valle.

During our Tea Break, Yoka told me she was an artist and showed me a beautiful bag made from one of her weavings. Then she gave me a wallet she had made from one of the wine boxes they bought while in Panama. (Look for the bunch of green grapes with yellow tape trim above.) She said she made the wallet because she needed a wallet to keep her  currencies separate while in Costa Rica. She also gave me a milk carton on which I could practice making my own, along with verbal instructions. I had some trouble finding the electrical tape she used to make hers, so the boxes and bags accumulated during the trip. I even collected a couple of wine boxes from fellow birders, including a nice one from Sue that is on its way to her now as a Red Wine Yoka Wallet. She is going to give it a test run. I hope it holds up and is fun to use! The graphics and text make this a great ReUse Project.

I ended up making several wallets from boxes I brought back (they are SO common down there), including a couple from the Duran coffee bags we bought on our first day in El Valle and one from an apple juice box, the text mostly in Spanish. My favorite, though, is one I made from a box I bought here in our local supermarket. I love mango juice, so it didn't take long to come up with this:


To make a Yoka wallet:
  • Try to find a box that has a rectangular circumference, to avoid making the "pleats" too thick. If the box is fairly lightweight, it doesn't matter so much.
  • Wash the beverage box thoroughly (of course).
  • With an Exacto knife or box cutter, cut off the bottom of the box. I like to use a plastic square on a cutting mat to get it even and - well - square.
  • Cut off the half of the top that holds the spout, leaving the other half for your top flap.
  • Fold the sides of the box inward so that a symmetrical pleat is formed.
  • Fold the length of the box in half, using a bone folder or some some other tool to flatten the fold. (Pliers may be needed to squash the fold enough to make it fold properly.)
  • You may want to use electrical tape on all the cut edges, but you must at least use a length of tape to join the innermost edges together so you end up with two compartments.
  • The extra flap you left when you cut the top of the box will be folded over now to cover the compartments.
  • Glue little pieces of Velcro on the edge of the flap and on the front of the wallet so they meet up. (You might need to put tape on the flap if the glue doesn't adhere to the plastic of the box interior. Seems to stick better to the tape.) I used the very serious E6000 glue.
  • Put a little money inside and let it steep for a day before taking your Yoka Wallet out into the world.
Please try this out and send me any comments about how to improve my directions. Enjoy!

What Happened in Panama?!

Besides filling a journal with bird lists, brief descriptions of daily activities, and a few drawings, I brought home a wealth of ideas for future art work and loads of photos to remind me of what inspired me.

I found a nice landscape-format sketch book with medium weight watercolor paper and covered it with some beautiful paper, including a label with hand-stamped lettering. I finished the inside cover with more of the green paper. Then I covered the outside with about three coats of glossy gell medium to protect it.
On the inside of the back cover, I made a large envelope out of an old calendar page and more paper. (I have to have a safe place to stash brochures, receipts, and other papers to use for the final compilation of the trip in the journal!) Of course, there were a few too many things in there and the next-to-last day of the trip, the end of the envelope blew out. Not bad for a month's worth of collecting though.

Here are a few of the pages, including one of the pages on which I glued the week's dates with spaces for a day's summary. I kept the "date strips" (also cut from an old calendar for a month when the dates and days matched those for March 2010) in the envelope and inserted them at the right place in the journal, not knowing ahead of time how many pages I would use. It turned out to be a great system for us, especially when we joined our bird tour group and we were busy all day and tired when we could finally rest. 

I left lots of space for photos, collaged sections of brochures, interesting receipts, and little doodles. Now I am in the process of printing out the photos on brochure paper (so they are not too thick), using my Microsoft Publisher software so I can adjust each photo to the size I want and to print out full sheets of many photos at once. I then cut them apart and place them in the journal with archival sticky strips or tape.

Eventually, we will have a completed journal that can give us not only lots of little facts we will want later but - more importantly - a way to remember and immerse ourselves in this wonderful, rich, full trip.